Add tickets to Apple Wallet or Google Wallet
This page explains the function to add tickets to the Wallet App on your smart phone.
You can add the ticket issued during event registration to your smartphone's Wallet App.
At the event's entrance, you can display the QR code from your Wallet App and print the ticket.
The organizer can scan the QR code displayed in your Wallet App for check-in.
Entry procedures may vary for each event, so please check the instructions provided by the event organizer.
The date and time shown in the Wallet App is the event start date and time.The ticket name and the date included in the ticket name will not be displayed.
For events that require confirmation of the ticket name at the time of admission, please use the PDF ticket instead of the Wallet App.
- How to Use and Supported Devices
- Adding Tickets to Apple Wallet
- Adding Tickets to Google Wallet
- To send tickets to other participants
- Remove passes from Wallet App
- Information displayed on the wallet Passes
1. How to Use and Supported Devices
■How to Use
Please ensure that the Wallet App is installed on your device.
When entry to the event or presentation of QR codes is required at the venue, display the tickets added to the Wallet App.You can display the QR code from your Wallet App and print the ticket.The organizer can scan the QR code displayed in your Wallet App for check-in.
■Supported Devices
【Apple】
iPhone Series and iPad Series with Face ID or Touch ID Support
・iPhone 7/7 Plus and Later
・iPad mini (5th generation)Later、iPad(5th generation)Later
iOS Recommended Browser
・Mobile Safari (latest version)
【Android】
Android 7.0 Later
Android Recommended Browser
・Chrome (latest version)
※Wearable devices (Apple Watch, Google Pixel Watch) are not supported.
2. Adding Tickets to Apple Wallet
※Please ensure that the Apple Wallet App is installed on your Apple device.
STEP1)Add the ticket to your Wallet App using one of the following methods:
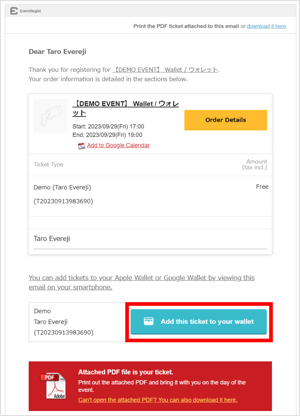
- Click on [Add This Ticket to Your Wallet] in the order confirmation email.
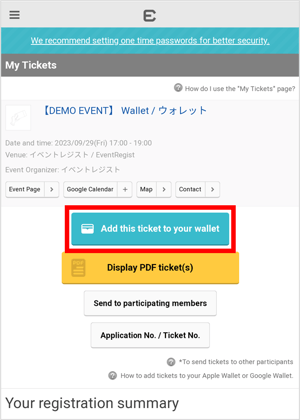
- Click on [Add This Ticket to Your Wallet] in My Tickets.
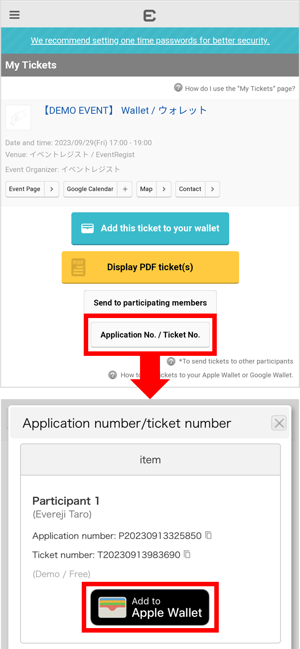
- In My Tickets, click on [Application No. / Ticket No.] > [Add to Apple Wallet].
- If the login screen appears, please Login with the account you used to register for the ticket.
- If a "404 File Not Found" message is displayed, you may be logged in with a different account. Please Login again with the account you used to register for the ticket and try again.
- For events that do not require Tickets, the "Add to Wallet" button will not appear due to settings made by the event organizer.
STEP2)Press [Add] on the Wallet App.
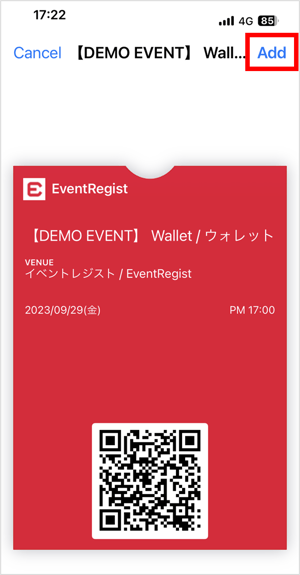
STEP3) Please make sure the ticket is displayed in your Wallet App.
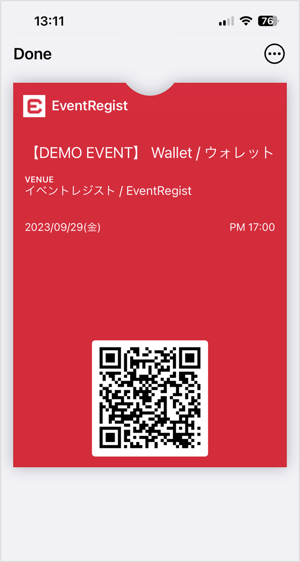
For instructions on how to use an Apple device, please refer to Apple's website
Reference : Add, use, and share boarding passes, tickets, and other passes in Apple Wallet (Apple Support)
3. Adding Tickets to Google Wallet
※Please ensure that the Google Wallet App is installed on your Android device.
STEP1)Add the ticket to your Wallet App using one of the following methods:
- Click on [Add This Ticket to Your Wallet] in the order confirmation email.

- Click on [Add This Ticket to Your Wallet] in My Tickets.

- Click on [Application No. / Ticket No.] > [Add to Google Wallet] in My Tickets.
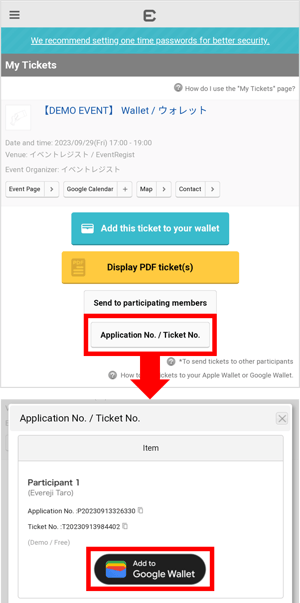
- If the login screen appears, please Login with the account you used to register for the ticket.
- If a "404 File Not Found" message is displayed, you may be logged in with a different account. Please Login again with the account you used to register for the ticket and try again.
- For events that do not require Tickets, the "Add to Wallet" button will not appear due to settings made by the event organizer.
STEP2)Press [Add] on the Wallet App.
When the checkmark appears, press [View in Wallet] for confirmation.
Note* Depending on your device, it may take a few seconds for the wallet to appear.
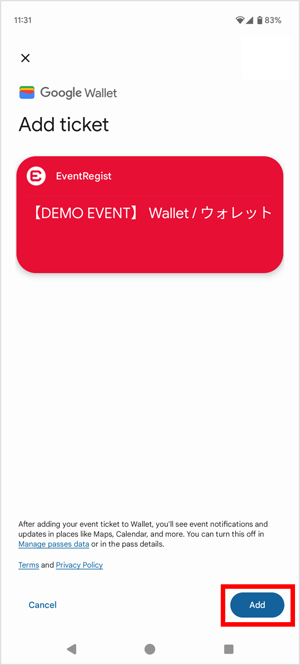
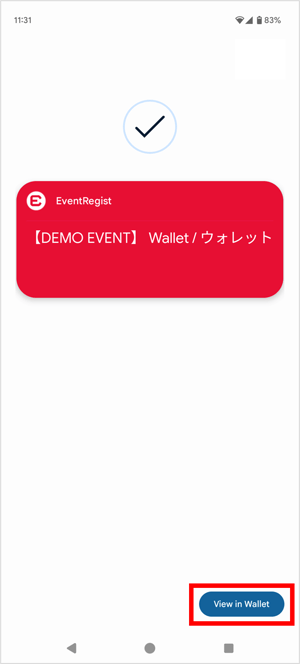
STEP3) Please make sure the ticket is displayed in your Wallet App.
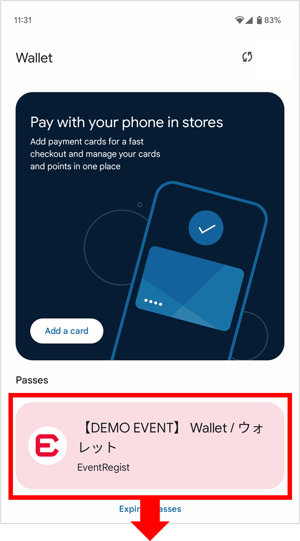

For instructions on how to use an android device, please refer to the Google website.
Reference : Save & use flight or event tickets (Google Wallet Help)
4. To send tickets to other participants
If you have registered tickets on behalf of others, such as group tickets for companions, you can transfer the tickets with QR codes to each attendee. The transferred attendees can then add the tickets to their own Wallet App for use.
In My Tickets, Press Send to Participating members] and verify the email addresses of the participants displayed. The email addresses registered during the application will be shown, but you can also input other email addresses if needed. Press [Send to attendees selected above].
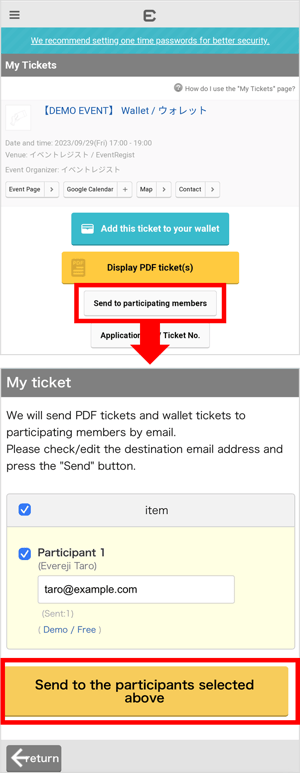
Participants who have received the email can add it to their wallet from their smartphone.
▼ Email Sent to Participants - Sample Display
Subject : PDF ticket and wallet ticket are attached

5. Remove passes from Wallet App
Tickets (passes) added to the wallet can be deleted using the Wallet App.
■For iPhone/iPad's Apple Wallet:
- On your iPhone/iPad, open the Wallet app.
- Tap the pass that you want to remove.
- Tap the More buttonmore icon with three dots, then tap Pass Details.
- Tap Remove Pass, then confirm.
For information on how to operate Apple devices, please refer to the Apple website.
Reference : How to remove a pass from Apple Wallet (Apple Support)
■For Android's Google Wallet:
- On your phone, open the Google Wallet app .
- Tap the pass that you want to remove.
- At the top right, tap More More.
- Tap Remove Pass, then confirm.
For information on how to operate Android devices, please refer to Google website or the help pages for each device.
Reference : Manage items in Google Wallet (Google Wallet Help)
* Please refer to the "Remove items from Google Wallet" section.
6. Information displayed on the Wallet Passes
The following information will be displayed on the Wallet Passes.
- Event name
- Venue name
- Date of the event (start date)
- Start time
- QR code

Note :
- If you need to present a ticket name, serial number, or other information not shown above when entering an event, please use the PDF ticket instead of the Wallet.
- The PDF ticket is attached to the Application confirmation e-mail. You can also obtain it from your own "My Tickets" page.
Reference) Downloading Tickets - The admission procedures may differ for each event. Please refer to the instructions provided by the event organizer for the specific event you have registered for.