In order to create a new event in EventRegist, you must first complete the Member Sign-up process.
▶ Learn more : New Member Sign-up
Once the Member Sign-up is complete, log in to EventRegist and follow the steps below.
Procedure)
- STEP1. Basic Info
- "Password Protected" and "Custom URL"
- STEP2. Add Date & Time
- STEP3. Ticket & Price Settings
- STEP4. Payment Option
STEP1. Basic Info
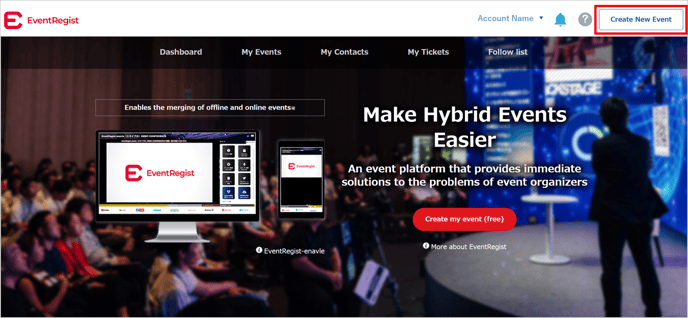
To create a new event on EventRegist, click the "Create New Event" button on the EventRegist index page.
Next, we specify the basic information for your event.
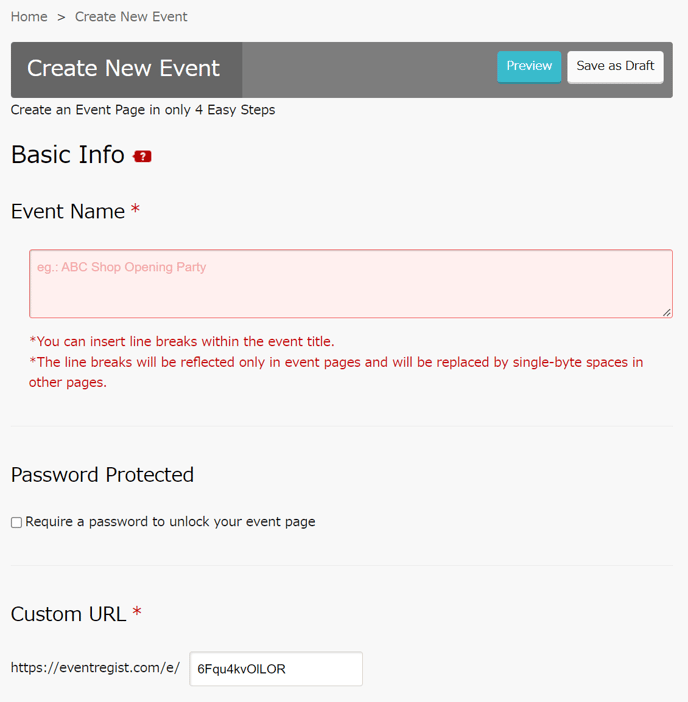
- Event Name:
You enter the name of your event here. You can set this to any name of your choosing.
*The character limit is 150 characters.There is no limit to the number of line breaks.
*You can insert line breaks within the event title.
*The line breaks will be reflected only in event pages and will be replaced by single-byte spaces in other pages. - Password Protected:
If you don't want your event page to be freely accesible, you can set a password on the event page. If you choose to set a password, check the "require a password to unlock you event page" checkbox and then set a password (single byte latin alphabet and numbers only) of your choosing.
If you go to the URL of a password protected page, you will be presented with the password confirmation screen.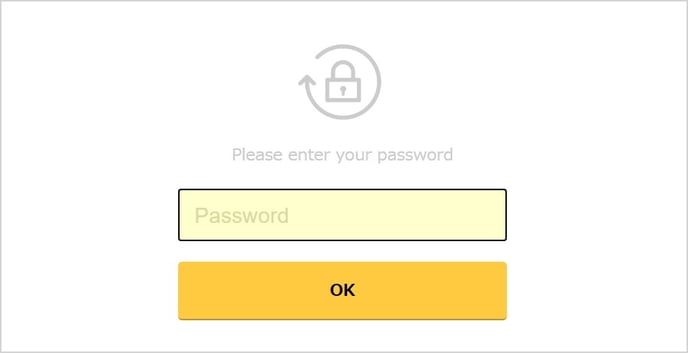
- Custom URL:
You can set the event page URL to a string of your choice (only single byte latin alphabet and numbers).
- (hyphen) and _ (underbar) are available.
. (dot) and / (slash) are not available.
If you don't need a custom URL, a pre-prepared URL will be applied.
If you customize your event page URL it will appear as below.
http://eventregist.com/e/YourCustomURLHere
It is not possible to set up both URL customization and password protection at the same time.
If you want to set up these settings, please follow the steps below.
- Customizing the URL without setting password protection.
- Enter the ticket information and other items, and then [Save as Draft].
- Set up "Password Protected" from the left side menu. (Click here to learn how to set up).
- Make the event publish.
STEP2. Add Date & Time
Enter the date, time and venue of the event.
■Event Starts
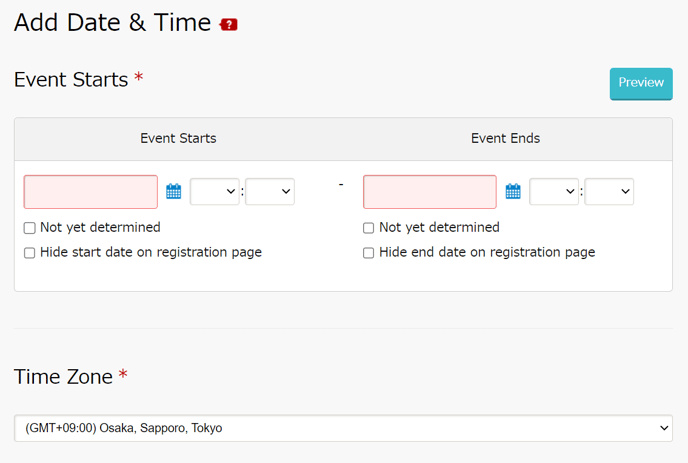
- Event Starts:
Enter the start and end date and time of the event.
The date is a required field. If the date is undecided, set a tentative date, and then check [Hide start date on registration page] and [Hide end date on registration page] to make the date unavailable on the event page.
If the time is undecided, check [Not yet determined], the time frame will be blank. The event page will show "(Time not yet determined)".
Both the date and time can be changed later. - Time Zone:
Select the time zone in which the event will take place.
■Event Types / Location
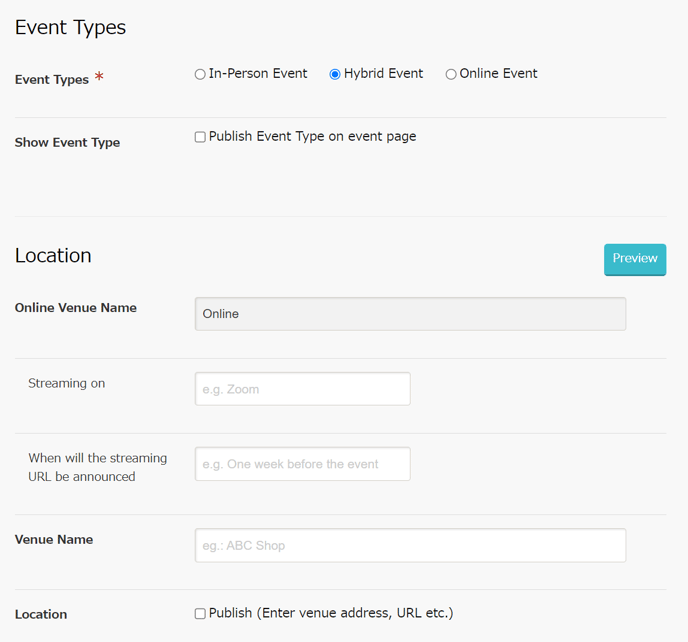
- Event Types:
Please select In-Person Event / Hybrid Event / Online Event. The event format is a required field and can be changed later.
If you check the "Publish Event Type on event page" checkbox, a badge for the event type will be displayed on the event page.
▼ Event Page Display Image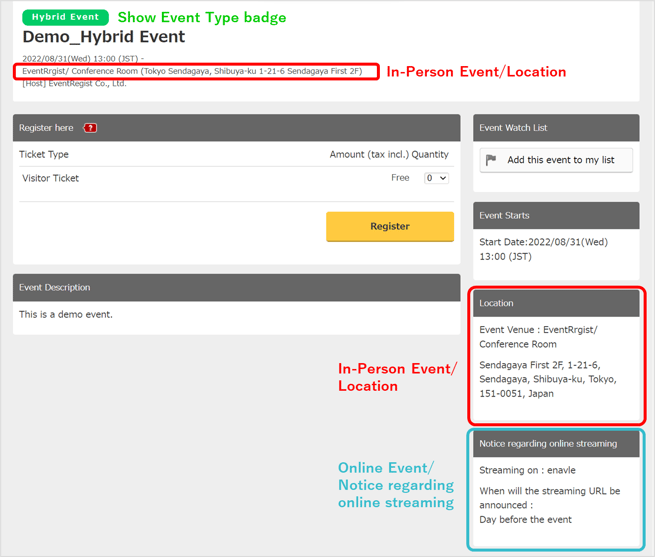
Even if Event Types is set to "Online", the Ticket Application Confirmation Email and the applicant's My Tickets will still attach/show PDF tickets, which are mainly used for offline events.
With the Premium feature, you can choose not to attach/show the PDF ticket.
After creating the event page, please set up the Ticket distribution/display settings additionally.
▶ Learn more : [Premium] Ticket Distribution and Display Settings - Location:
Enter information according to the Event Types selected.
[Online Event] "Streaming on" and "When will the streaming URL be announced" can be set. "Online" is entered in the "Online Venue Name" field, but it will not be displayed on the event page.
[In-Person Event] You can set the venue name, location, Google Map display, etc.
[Hybrid event] Both "In-Person" and "Online" fields will be displayed.
To enter details of the location of the In-Person Event, check [Publish (Enter venue address, URL etc.)] to display the entry field.
The [Show Google Map] checkbox is checked by default; adjust the display range and pointer position of the Google Map.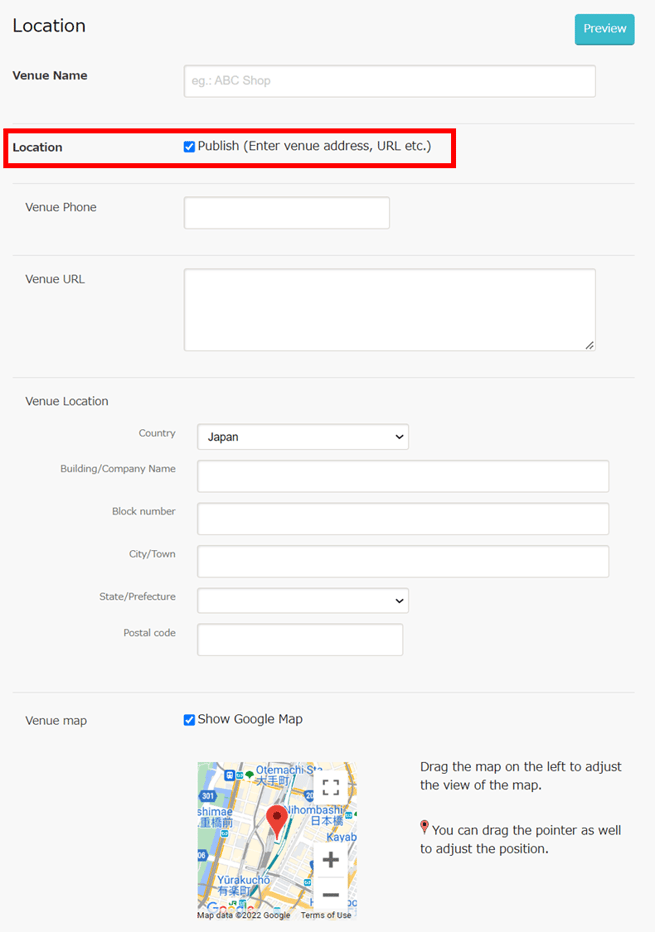
STEP3. Ticket & Price Settings
You can register tickets. You can register both paid tickets and free tickets.
If you want to register more than one type of ticket, click [Add New Ticket Type]. You can also add tickets later.
[Note]
You cannot delete a ticket you have created.And you can't change "Ticket Name" and "Ticket Price" after you created the ticket.
If you change the information of the ticket which has already been ordered later, it may cause confusion to the applicant.
If you need to delete the ticket, please set the ticket to [Private] and create a new one. If you set it to [Private], it won't appear on the event page.
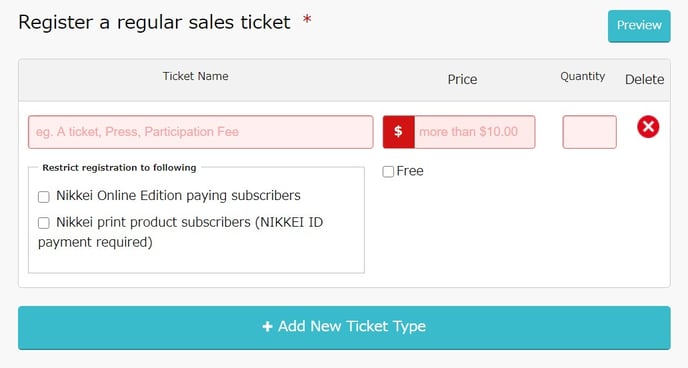
- Ticket Name:
This is the name of the ticket for which the event attendees are applying.For example, please enter "A seat", "Press seat", "Participation fee" or any other name you wish to use. - Price:
This is the amount of the ticket. Please enter the amount, including tax.
The minimum price is 500 yen. (If you would like to sell a ticket for less than 500 yen, please contact us.
Check [Free] if it's a free ticket. - Quantity:
The number of tickets. The number of tickets is automatically ordered up to the number of tickets you set, and when the maximum number is reached, the message "Sold Out" will appear on your screen.
That's all you have to do to create a free ticket event.Click [Save & Publish] at the bottom of the page to create your event.If necessary, go to "Edit Event Page Design" and "Detailed Ticket Settings".
▶ Learn more: Editing the Event Page Design
▶ Learn more: Detailed Ticket Settings
For paid tickets, please go to STEP 4.
STEP4. Payment Option
For paid tickets, the "Payment Option" and "Event Organizer's information for Receipt data" settings will be displayed.
In case of free tickets, it is not displayed.
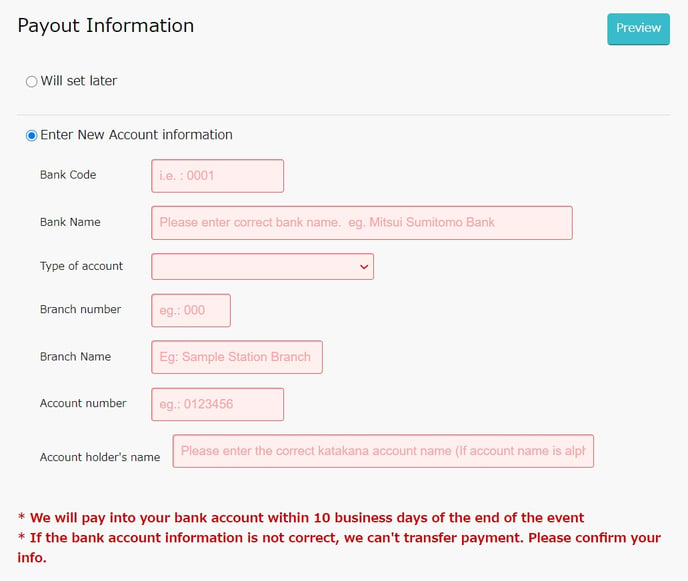
■Payment Option
Please enter your account information. You can set this up later.
[Note]
We will transfer the amount of ticket sales, minus a handling fee, from event registry within 10 business days after the event. Please make sure you enter the correct account information for the transfer.
You may choose to skip this step by selecting "Will set later", but please note that if your account information is not set up by the end of the event, we may delay the transfer of funds.
■Event Organizer's information for Receipt data
You can choose whether to [Do not allow ] or [Allow] the issuance of the receipt data to paid ticket purchasers.
If you select [Allow], the receipt data can be displayed in the applicant's "My Tickets".
Enter the information of the organizer to be written in the receipt data.

If the organizer cancels a paid ticket after it has been sold, please note the following.
[Note]
In case the date of cancellation is more than 50 days after the date of application, a refund of purchased tickets will be charged to the event organizer at the following rate per ticket sold.
- If the ticket price 3,000 or less per ticket : 300 yen per ticket
- If the ticket price 3,001 yen or more per ticket : 10% of the ticket price per ticket
Once you have completed your entry,click [Save & Publish] at the bottom of the page to create your event.If necessary, go to "Edit Event Page Design" and "Detailed Ticket Settings".
▶ Learn more: Editing the Event Page Design
▶ Learn more: Detailed Ticket Settings
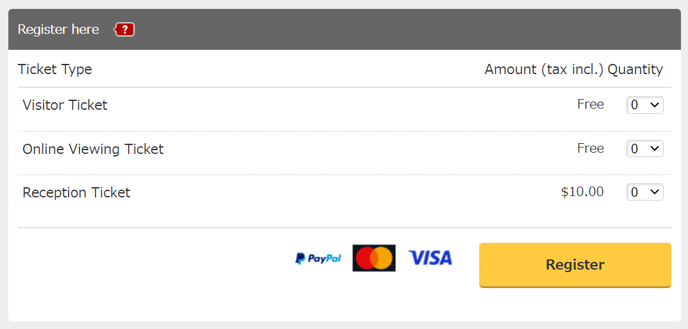
▼ Ticket display image on the event page
For free tickets only, the credit card icon will not be displayed.
If the above does not solve your problem, please contact us via the inquiry form.
(Our business hours are from 10:00am to 6:00pm Japan time on weekdays. For inquiries made on weekends and holidays, our response may be on the next business day.)